Register Image underlay/overlay (Dialog)
Any arbitrary image file can be loaded within that image registration dialog
(button "Load Image") and located properly within the model coordinate system:
exact location of two points of the picture will be specified within
workspace coordinate
system. The image registered by such can be displayed within
Elements 2D window (either as
an underlay or as partly transparent overlay) and used for better orientation
during the entry of elements during the model creation.
Remark: The planar underlay is registered at the plane shown within the
window. Within the context of
Elements23 window (i.e. a
3D-Project) up to
three underlays can be registered within respective
quadrants.
This dialog can be reached via the
Main Menu-Import or from the
context menu of the Element 2D window.
Remark:
If there is an image defined already (registered) then the image
registration data can be adjusted within this dialog.
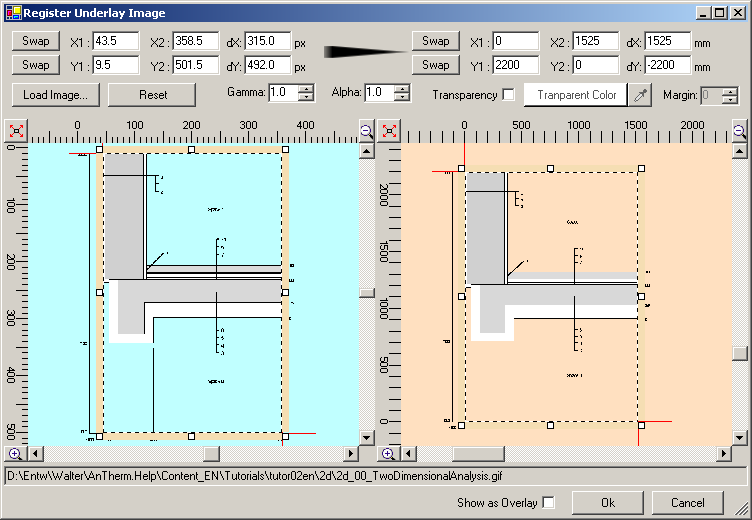
The left part of the window display the loaded image within its pixel
coordinate system. Entry of pixel coordinates of two points of the image defines
the initial part of the transformation to the workspace coordinate system. Input
can be done either by numerical entry or by dragging the selection rectangle
with the mouse - the selection rectangle will automatically align (snap) to
whole pixel coordinate values or to pixel boundary values.
Graphical user interface elements and their behaviour are identical to
Elements 2D window.
Within the right part of the window the position of the two chosen image points within the workspace coordinate system has to be defined (in millimetres). Input can be done either by numerical entry or by dragging the selection rectangle with the mouse.
Important: Please observe, that coordinate values of pixel coordinate system (left image) are ordered from top toward bottom!
The location of chosen points is emphasized in both image views by red cross marks.
In addition to position registration some optimization of the display of the image in Elements 2D window can be reached by adjusting the transparency colour or colour value range (that colour range will be not rendered and result in transparency effect).
To make tha image display brighter the Gamma-Value can be adjusted.
For an overly display the transparency of the image can be set with its
Alpha-Value.
One can decide if the image will show as an underlay (i.e. below
elements and occluded by them) or as overlay (on top of elements). For the
latter case it advisable to choose partly transparent rendering (Alpha < 1.0).
Remark: These detailed settings can be easily adjusted directly from be
context menu of the Element 2D window also.
Important: Data enered here, including the absolute path to the image file, will be saved to the project file. Provided that several project can reference same image file as an underlay or overlay - moving the project file to different folder does not change the image file path. On the other hand, moving or renaming the image file itself will lead to the situation, that it cannot be loaded again and must be re-registered.
Important: The data of the image itself is kept within the image file. Only the path name to the image file is stored within the project file.
Following image file formats can be loaded: JPG, BMP, GIF, TIF, PNG
See also: Main menu, Coordinate system, Context menu of the Elements 2D window, Project file